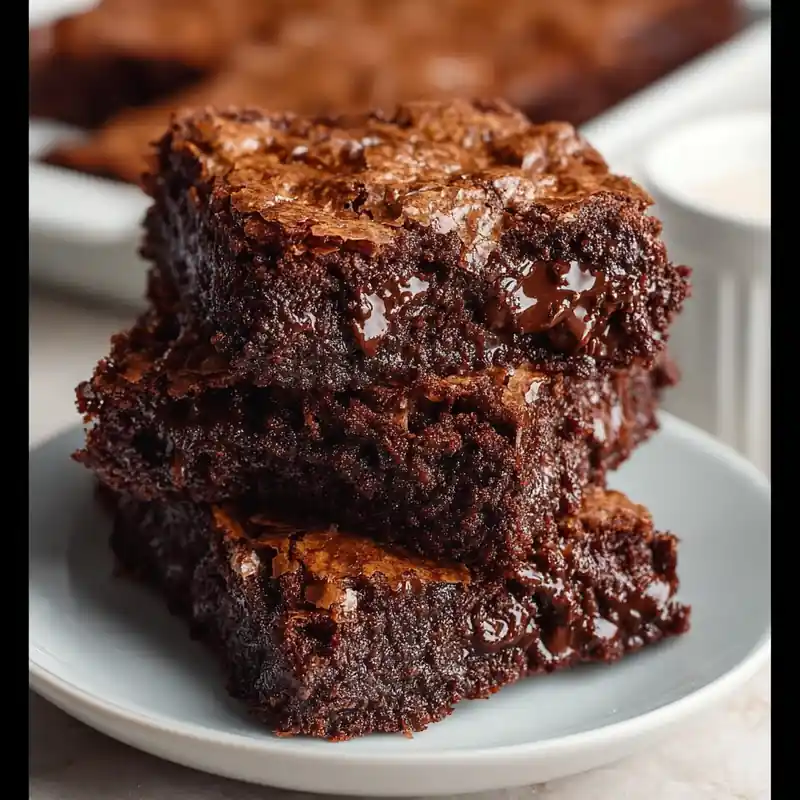
If you’ve ever wished for a brownie that’s intensely chocolatey, incredibly fudgy, and surprisingly simple to make, these Cottage Cheese Flourless Brownies deserve a spot at the top of your baking list. They have a deep cocoa flavor, a soft and dense center, and a rich texture that becomes even better after a few hours in the refrigerator. Every bite delivers that classic brownie satisfaction without using any flour at all.
The secret ingredient might sound unexpected, but cottage cheese blends into a perfectly smooth batter, creating a moist, creamy consistency that bakes into a luscious dessert. Once combined with eggs, honey, and Dutch process cocoa powder, it transforms into something that tastes far more indulgent than its short ingredient list suggests.
One of the best parts of this recipe is how approachable it is. Everything comes together in a blender, meaning there’s no need for complicated mixing techniques or multiple bowls. The batter becomes silky in just a few minutes, making this an excellent choice whether you’re baking on a busy weekday or preparing dessert for a special gathering.
As the brownies bake, your kitchen fills with the unmistakable aroma of rich cocoa. When they’re done, the center should look just set with a slight softness that promises a fudgy interior after cooling. Chilling them for several hours—or even overnight—makes the texture firmer, denser, and easier to slice, while allowing the chocolate flavor to become even more pronounced.
For those who enjoy an extra layer of decadence, the optional dark chocolate frosting adds a glossy finish and velvety richness that pairs beautifully with the brownies’ deep cocoa base. It’s a simple addition that makes these brownies look bakery-worthy with very little extra effort.
Before you preheat the oven, though, it’s worth understanding why this surprisingly small combination of ingredients works so well together. There’s a bit of baking science behind the smooth texture and rich flavor, and knowing it can help you achieve consistently perfect results every time. We’ll explore that—and a few beginner-friendly secrets—in the sections ahead.
Why You’ll Love This Cottage Cheese Flourless Brownies Recipe
These brownies are much more than a clever way to use cottage cheese. They combine simple ingredients with an easy method to create a dessert that’s rich, satisfying, and wonderfully fudgy. Here are all the reasons they’re likely to become a repeat favorite.
- Incredibly fudgy texture. Chilling the brownies after baking gives them a dense, melt-in-your-mouth consistency that brownie lovers crave.
- No flour required. Since the recipe is naturally flourless, the cocoa and creamy cottage cheese take center stage, creating an intensely chocolatey bite.
- Blender-friendly simplicity. The batter comes together in minutes with just a blender, making cleanup quick and the preparation nearly effortless.
- Rich chocolate flavor. Unsweetened Dutch process cocoa powder delivers a deep, smooth cocoa taste that feels indulgent without requiring a long ingredient list.
- High in protein from cottage cheese and eggs. The cottage cheese and eggs contribute protein while also creating a moist, tender crumb that stays delicious even after refrigeration.
- Naturally sweetened with honey or adaptable with coconut sugar. You can choose the sweetener that best fits your pantry while still achieving a balanced chocolate flavor.
- Perfect for making ahead. These brownies actually improve after chilling for several hours or overnight, making them ideal for preparing in advance for parties or meal prep.
- Optional frosting for extra decadence. The simple dark chocolate and coconut milk topping creates a glossy finish and an even richer dessert when you’re craving something special.
- Beginner-friendly recipe. There are no complicated techniques or special baking skills required. Smooth batter, bake, cool, and chill—that’s the path to success.
- Easy to customize for different occasions. Serve them plain for an everyday treat or add the optional frosting for holidays, birthdays, or gatherings when you want an elegant presentation.
Quick Snapshot
| Feature | What You’ll Love |
|---|---|
| Texture | Dense, fudgy, and creamy after chilling |
| Flavor | Deep chocolate with balanced sweetness |
| Prep | Simple blender batter |
| Baking Method | One pan, minimal cleanup |
| Make-Ahead | Even better after overnight chilling |
| Optional Finish | Smooth dark chocolate frosting |
Many people are surprised that such a short ingredient list can produce brownies with this much richness and structure. The answer lies in how each ingredient works together during blending and baking. In the next section, we’ll take a closer look at the science behind the recipe and reveal the small details that give these brownies their signature texture and flavor.
The Secret Behind This Cottage Cheese Flourless Brownies Recipe
At first glance, this recipe seems almost too simple to produce such rich, fudgy brownies. With just a handful of ingredients, you might wonder how they hold together without flour or traditional butter. The answer lies in the unique role each ingredient plays and how they work together during blending and baking.
Why Cottage Cheese Works So Well
Cottage cheese is the foundation of these brownies. When blended until completely smooth, it loses its curd-like texture and becomes a creamy base that adds moisture and structure to the batter.
Because it contains both protein and fat, it helps create a brownie that’s dense and tender rather than dry or crumbly. Instead of tasting like cheese, it fades into the background, allowing the chocolate flavor to shine.
If your blended mixture looks silky and pourable with no visible curds, you’re on the right track.
Eggs Create Structure
Without flour, the eggs become even more important.
As the brownies bake, the proteins in the eggs set and help hold everything together. They provide stability while still allowing the center to remain soft and fudgy.
This is why it’s important not to underbake or overbake the brownies. A center that’s just set will continue to firm up as it cools and chills.
Dutch Process Cocoa Does More Than Add Flavor
The cocoa powder isn’t only responsible for the brownies’ deep chocolate taste.
It also absorbs some of the moisture from the blended ingredients, helping create a thicker batter and a more substantial texture. Dutch process cocoa contributes a smoother, less acidic chocolate profile, resulting in a rich flavor that’s balanced and mellow.
A batter that appears thick but easily spreadable is exactly what you want before it goes into the oven.
The Sweetener Helps More Than You Think
Whether you use honey or coconut sugar, the sweetener does more than provide sweetness.
- It balances the natural bitterness of cocoa.
- It contributes to the moist interior.
- It helps create a tender bite.
- It encourages gentle browning during baking.
Because the sweetener affects both flavor and texture, the finished brownies remain soft rather than cake-like.
Why Blending Matters
One small step has a big impact: blending until completely smooth.
Even a few remaining cottage cheese curds can affect the final texture. A fully blended batter bakes more evenly and creates the uniform, velvety consistency that makes these brownies so satisfying.
If your batter looks glossy and homogeneous before baking, you’ve already set yourself up for success.
Pro Tip: Scrape down the sides of the blender before adding the cocoa powder to ensure every bit of cottage cheese is fully incorporated.
Don’t Skip the Chill Time
It can be tempting to slice into the brownies while they’re still warm, but patience pays off.
As they cool, the structure continues to develop. After several hours in the refrigerator—or even better, overnight—the brownies become noticeably denser, easier to cut, and even more intensely chocolatey.
Many first-time bakers are surprised by just how much the texture improves after chilling. What starts as a soft baked dessert transforms into a rich, fudgy square with clean edges and a luxurious bite.
Understanding these simple interactions makes the recipe feel almost foolproof. Next, we’ll take a closer look at each ingredient individually, explaining its purpose, storage tips, possible substitutions, and the small details that can help you get the best results every time.
Ingredient Deep Dive
Every ingredient in these Cottage Cheese Flourless Brownies serves an important purpose. With such a short ingredient list, each component contributes to the texture, flavor, and overall success of the recipe. Understanding what each ingredient does can help you achieve consistently rich, fudgy brownies every time.
High-Protein 4% Cottage Cheese
This is the star of the recipe and the ingredient that gives the brownies their signature moist, dense texture.
Purpose
- Creates a creamy base for the batter
- Adds moisture and richness
- Provides protein that helps support the flourless structure
Flavor
When blended until smooth, the mild dairy flavor becomes virtually undetectable, allowing the chocolate to remain the dominant taste.
Texture
The cottage cheese transforms into a silky mixture that helps produce a soft, fudgy brownie instead of a dry or crumbly one.
Buying Tips
- Choose 4% milkfat cottage cheese for the richest texture.
- High-protein varieties work especially well because they blend into a thick, creamy batter.
- Avoid products with excessive liquid if possible.
Storage Tips
Keep refrigerated and use before the expiration date. Once opened, use within a few days for the freshest flavor and consistency.
Expert Advice
Blend thoroughly until completely smooth. Any visible curds in the batter may remain noticeable after baking, so take an extra minute if needed.
Large Eggs
Eggs are essential in a flourless recipe because they provide the structure that flour would normally contribute.
Purpose
- Bind the ingredients together
- Help the brownies set during baking
- Contribute moisture and richness
Flavor
Eggs have a neutral flavor here, allowing the cocoa and sweetener to take center stage.
Texture
They create a firm yet tender interior that becomes even denser after chilling.
Buying Tips
Use large eggs as written for the intended balance of liquid and structure.
Storage Tips
Keep refrigerated and use while fresh for the best baking results.
Expert Advice
Using eggs at room temperature can help them blend more smoothly with the cottage cheese, creating a more uniform batter.
Honey
Honey adds sweetness while also contributing moisture, resulting in brownies with a soft and luscious bite.
Purpose
- Sweetens the batter
- Helps retain moisture
- Balances the bitterness of cocoa
Flavor
Its natural sweetness complements the chocolate without overpowering it.
Texture
Honey helps create a smooth, tender crumb and contributes to the brownies’ fudgy consistency.
Buying Tips
Choose a mild-flavored honey if you want the chocolate flavor to remain the star.
Storage Tips
Store tightly sealed at room temperature.
Expert Advice
Measure honey in a lightly greased measuring cup to help it pour out easily and reduce waste.
Coconut Sugar (Alternative Sweetener)
If you prefer, the honey can be replaced with 1 cup plus 2 tablespoons of coconut sugar.
Purpose
- Sweetens the brownies
- Helps balance the cocoa’s natural bitterness
Flavor
Coconut sugar offers a subtle caramel-like sweetness that pairs beautifully with rich chocolate.
Texture
Because it’s a granulated sweetener rather than a liquid one, the finished texture may be slightly different while still producing delicious brownies.
Buying Tips
Look for finely textured coconut sugar for easier blending.
Storage Tips
Store in an airtight container in a cool, dry place.
Expert Advice
Blend thoroughly to help the coconut sugar dissolve evenly into the batter.
Unsweetened Dutch Process Cocoa Powder
This ingredient provides the bold chocolate flavor that defines the entire recipe.
Purpose
- Delivers rich chocolate taste
- Helps thicken the batter
- Contributes to the brownies’ dense structure
Flavor
Dutch process cocoa has a smooth, mellow chocolate profile with less acidity than natural cocoa powder.
Texture
It absorbs moisture and helps create a brownie that’s fudgy rather than loose or pudding-like.
Buying Tips
Choose fresh cocoa powder with a deep brown color and no clumps for the best flavor.
Storage Tips
Keep tightly sealed in a cool, dry pantry away from heat and moisture.
Expert Advice
Blend until no dry streaks remain so the finished brownies have a uniform color and texture.
Optional Chocolate Frosting Ingredients
If you decide to add the frosting, these two ingredients create a glossy, rich topping that takes the brownies to another level.
Dark Chocolate Chips
Purpose
- Form the base of the frosting
- Provide concentrated chocolate flavor
Flavor
Dark chocolate brings a rich, slightly bittersweet note that complements the sweetness of the brownies.
Texture
When melted with hot coconut milk, it becomes silky and spreadable.
Buying Tips
Choose good-quality dark chocolate chips for the smoothest finish and best flavor.
Storage Tips
Store in a cool, dry place and keep the bag tightly sealed after opening.
Expert Advice
Let the hot coconut milk sit over the chocolate chips for the full 60 seconds before stirring. This encourages a smoother ganache-like consistency.
Canned Coconut Milk
Purpose
- Melts the chocolate into a smooth frosting
- Adds richness and creaminess
Flavor
It has a subtle coconut note that blends gently into the dark chocolate without overpowering it.
Texture
Creates a glossy frosting that spreads easily over fully cooled brownies.
Buying Tips
Shake the can before opening if recommended by the manufacturer to help distribute the contents evenly.
Storage Tips
Refrigerate any unused portion in a sealed container and use within a few days.
Expert Advice
Heat only until simmering. Overheating isn’t necessary and may affect the final texture of the chocolate mixture.
Quick Ingredient Checklist
Before you begin, make sure you have:
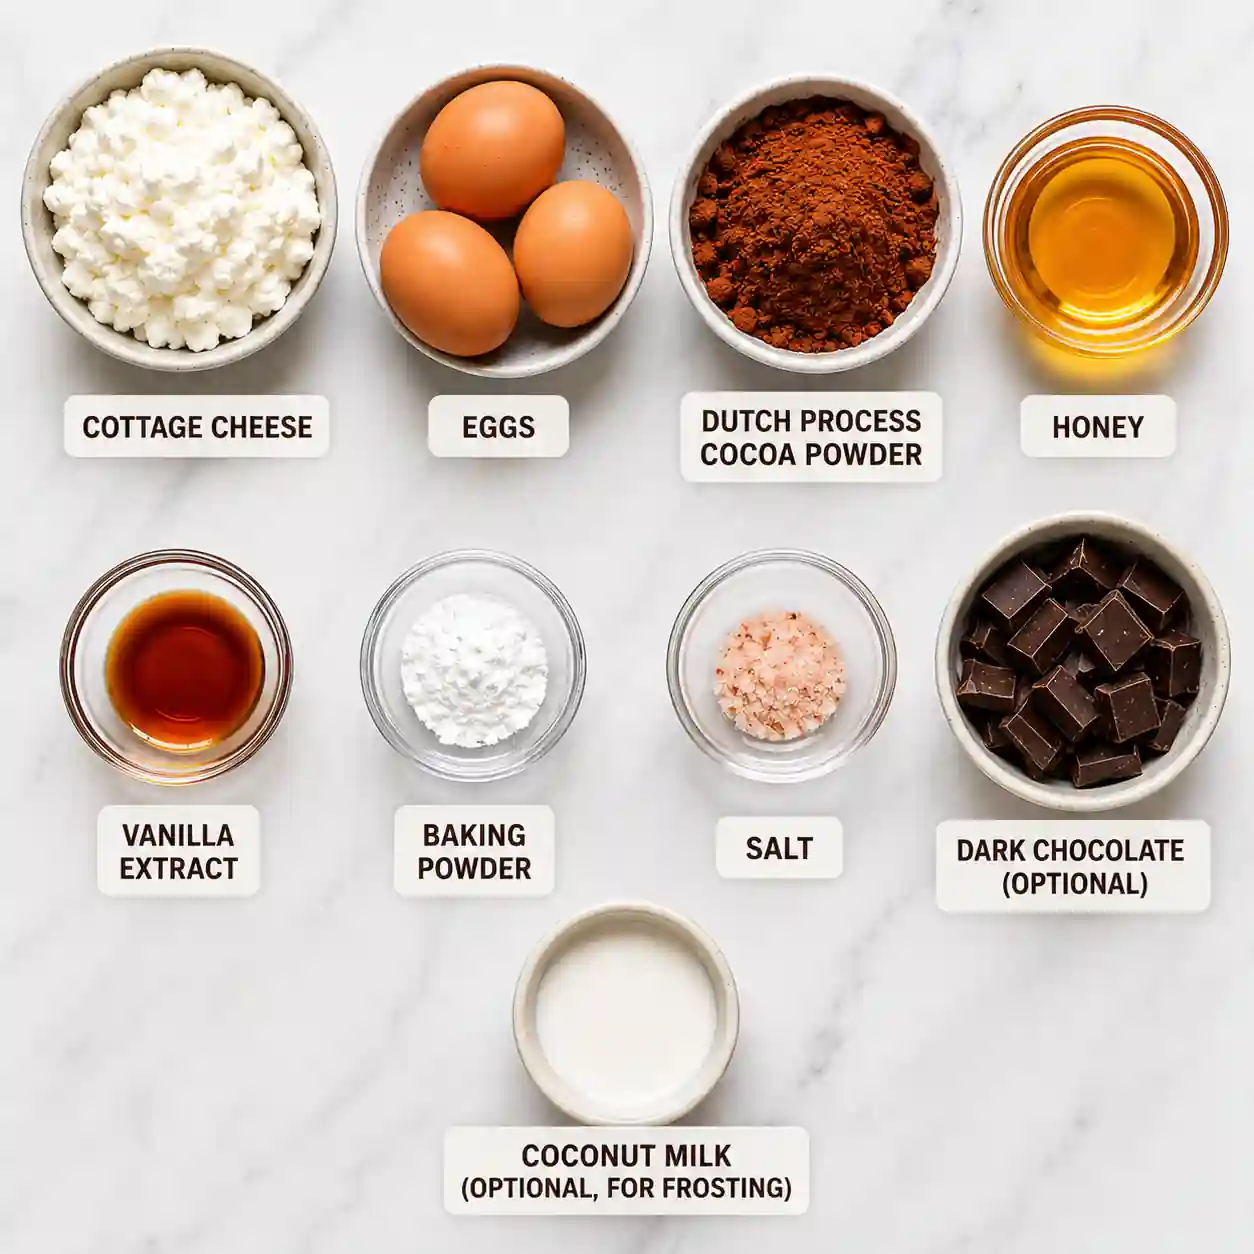
- 1½ cups high-protein 4% cottage cheese
- 3 large eggs
- ¾ cup honey or 1 cup + 2 tablespoons coconut sugar
- ¾ cup unsweetened Dutch process cocoa powder
- ½ cup dark chocolate chips (optional)
- ¼ cup canned coconut milk (optional)
With every ingredient playing a specific role, even small details can influence the final result. Up next, we’ll organize everything into a handy reference table that summarizes each ingredient’s purpose, best substitute, expert tip, and impact on the brownies’ texture for quick and easy consultation while baking.
Ingredient Tips Table
When you’re working with a recipe that uses only a few ingredients, every one of them has a noticeable impact on the final brownies. Use this quick-reference table while baking to understand the role each ingredient plays and how small choices can affect texture and flavor.
| Ingredient | Purpose | Best Substitute | Expert Tip | Texture Impact |
|---|---|---|---|---|
| High-Protein 4% Cottage Cheese | Creates the creamy base, adds moisture, richness, and protein | No substitute included in this recipe | Blend until completely smooth with no visible curds for the fudgiest result | Produces a dense, moist, and silky brownie |
| Large Eggs | Bind the ingredients together and provide structure during baking | None specified | Room-temperature eggs blend more easily into a uniform batter | Helps the brownies set while keeping the center tender |
| Honey | Sweetens the batter and adds moisture | 1 cup + 2 tablespoons coconut sugar | Pour from a lightly greased measuring cup for easy release | Creates a soft, moist, fudgy interior |
| Coconut Sugar (alternative sweetener) | Adds sweetness and balances the cocoa | Honey | Blend thoroughly so the sugar incorporates evenly | May produce a slightly firmer texture than honey |
| Unsweetened Dutch Process Cocoa Powder | Provides rich chocolate flavor and thickens the batter | None specified | Blend until no dry pockets remain for even flavor and color | Contributes to the brownies’ dense, chocolatey structure |
| Dark Chocolate Chips (optional frosting) | Form the base of the chocolate topping | None specified | Let the hot coconut milk sit for 60 seconds before stirring | Creates a smooth, velvety frosting |
| Canned Coconut Milk (optional frosting) | Melts the chocolate into a glossy topping | None specified | Heat only until simmering to avoid overheating the chocolate | Gives the frosting a creamy, spreadable consistency |
At-a-Glance Success Tips
Keep these simple reminders in mind for the best possible results:
- Blend the cottage cheese completely smooth before adding the cocoa powder.
- Mix until the batter is uniform with no streaks of cocoa remaining.
- Spread the batter evenly in the prepared pan to encourage even baking.
- Bake until the center is just set and a toothpick comes out mostly clean.
- Cool completely before chilling, then refrigerate for several hours or overnight for the ultimate fudgy texture.
- Apply the optional frosting only after the brownies have cooled, so it spreads smoothly and sets beautifully.
Baker’s Note: Because this recipe relies on a careful balance of moisture and protein instead of flour, measuring the ingredients accurately can make a noticeable difference in the final texture.
Now that you know what each ingredient contributes, it’s time to gather the tools you’ll need. The next section covers the essential equipment, explains why each item matters, and offers simple alternatives if you don’t have the exact tools on hand.
Equipment Needed
One of the best things about these Cottage Cheese Flourless Brownies is that they don’t require a kitchen full of specialty tools. With just a few basic pieces of equipment, you can create a smooth batter and bake perfectly fudgy brownies with minimal cleanup.
Blender
Why It Matters
The blender is the most important tool in this recipe. It transforms the cottage cheese, eggs, and sweetener into a silky-smooth mixture, eliminating any curds and creating the creamy base that gives these brownies their signature texture.
A well-blended batter bakes more evenly and produces brownies with a uniform crumb.
Alternative
- High-powered food processor
If using an alternative, blend until the mixture is completely smooth before adding the cocoa powder.
8-Inch Square Baking Pan
Why It Matters
An 8-inch square pan creates the ideal brownie thickness, allowing the center to become fudgy while the edges bake evenly.
Using a significantly larger pan may produce thinner brownies that bake more quickly, while a smaller pan may require additional baking time.
Alternative
- Similar-sized square baking dish with comparable capacity
Keep an eye on the brownies near the end of baking, as pan material and depth can slightly affect baking time.
Parchment Paper
Why It Matters
Lining the pan with parchment paper prevents sticking and makes lifting the entire batch out of the pan easy after chilling.
It also helps preserve clean edges when slicing.
Alternative
- Thoroughly grease the baking pan if parchment paper isn’t available
For the neatest presentation, leave a slight overhang of parchment on two sides to use as handles.
Measuring Cups
Why They Matter
Because this recipe contains only a handful of ingredients, accurate measurements help maintain the proper balance of moisture and structure.
Even small differences can influence the final consistency.
Alternative
- Kitchen scale for weight-based measuring when available
Using weights can improve consistency from batch to batch.
Rubber or Silicone Spatula
Why It Matters
A spatula helps scrape every bit of batter from the blender and spread it evenly into the prepared pan.
Since the batter is relatively thick, this simple tool minimizes waste and creates a level surface for even baking.
Alternative
- Large spoon
Take a moment to smooth the top before placing the pan in the oven.
Medium Heatproof Bowl (Optional Frosting)
Why It Matters
If you’re making the chocolate frosting, you’ll need a bowl large enough to hold the chocolate chips while the hot coconut milk melts them.
The bowl should retain heat long enough for the chocolate to soften before stirring.
Alternative
- Any sturdy heat-safe mixing bowl
Allow the mixture to rest for the full 60 seconds before stirring for the smoothest finish.
Small Saucepan (Optional Frosting)
Why It Matters
The saucepan gently heats the coconut milk until simmering, providing just enough heat to melt the chocolate chips into a glossy topping.
Alternative
- Small microwave-safe container for heating the coconut milk carefully
Whichever method you choose, avoid bringing the coconut milk to a vigorous boil.
Cooling Rack or Heat-Safe Surface
Why It Matters
Allowing the brownies to cool completely before refrigerating helps the structure set gradually and prepares them for clean slicing later.
Alternative
- Any flat, heat-resistant countertop or trivet
Patience during cooling is rewarded with a firmer, fudgier texture after chilling.
Equipment Checklist
Before you begin, gather the following:
- Blender
- 8-inch square baking pan
- Parchment paper
- Measuring cups
- Rubber or silicone spatula
- Medium heatproof bowl (for optional frosting)
- Small saucepan (for optional frosting)
- Cooling rack or heat-safe surface
Pro Tip: Assemble all of your tools before blending the batter. Since the recipe comes together quickly, having everything ready makes the process smooth and stress-free.
With your ingredients measured and equipment prepared, you’re ready for the most exciting part—the baking process itself. In the next section, we’ll walk through every step in detail, including visual cues, texture changes, chef tips, and common mistakes to help you bake confidently from start to finish.
Step-by-Step Instructions
These Cottage Cheese Flourless Brownies come together with just a few simple steps, but paying attention to the visual and texture cues along the way will help you achieve the richest, fudgiest results.
Step 1: Preheat the Oven
Preheat your oven to 350°F (177°C).
Starting with a fully preheated oven helps the brownies bake evenly from the moment the pan goes in. While the oven heats, gather your ingredients and prepare your baking pan.
Visual Cue: The oven should be fully heated before you begin baking to promote even cooking.
Step 2: Prepare the Baking Pan
Line an 8-inch square baking pan with parchment paper, leaving enough overhang on two sides to lift the brownies out after baking.
This simple step makes removal easier and helps you achieve neat, clean slices after chilling.
Visual Cue: The parchment should fit snugly into the corners with minimal wrinkles.
Chef Tip
Take a few seconds to press the parchment firmly into the pan before adding the batter. A flat liner helps the brownies bake into even squares with smooth edges.
Step 3: Blend the Cottage Cheese, Eggs, and Honey
Add the cottage cheese, eggs, and honey to a blender.
Blend until the mixture becomes completely smooth and creamy. There should be no visible cottage cheese curds remaining.
This is one of the most important steps in the recipe because a silky base creates the dense, uniform texture that makes these brownies so satisfying.
Visual Cue: The mixture should look glossy, pale chocolate-free, and pour smoothly without lumps.
Step 4: Blend in the Cocoa Powder
Add the unsweetened Dutch process cocoa powder to the blender.
Blend again until the batter is fully combined and evenly colored. Scrape down the sides of the blender if necessary to incorporate any dry cocoa.
The batter will become thicker as the cocoa absorbs moisture, but it should still spread easily.
Visual Cue: The finished batter should be rich brown, smooth, and free of streaks or dry pockets.
Common Mistake
Stopping the blender too soon.
If the batter still contains small curds or cocoa streaks, the finished brownies may have an uneven texture. Blend until the mixture is completely uniform for the best results.
Step 5: Pour the Batter into the Pan
Transfer the batter to the prepared baking pan.
Use a spatula to spread it evenly from corner to corner, smoothing the top as much as possible.
An even layer helps the brownies bake consistently across the entire pan.
Visual Cue: The surface should appear level with no thick mounds or empty corners.
Step 6: Bake
Place the pan in the preheated oven and bake for 40 to 45 minutes.
As the brownies bake, the aroma of chocolate will become more pronounced and the edges will appear set while the center remains slightly soft.
Avoid opening the oven repeatedly during baking, as temperature fluctuations can affect how evenly the brownies set.
Visual Cue: A toothpick inserted near the center should come out mostly clean, with a few moist crumbs rather than wet batter.
Chef Tip
It’s better to remove the brownies when the center is just set than to leave them in too long. They will continue to firm up as they cool and chill, preserving their signature fudgy texture.
Step 7: Cool Completely
Remove the pan from the oven and place it on a cooling rack or heat-safe surface.
Allow the brownies to cool completely before attempting to remove them from the pan or add the optional frosting.
Cooling gives the structure time to stabilize and makes the brownies easier to handle.
Visual Cue: The pan should feel close to room temperature before moving on.
Step 8: Chill Before Slicing
For the best texture and flavor, refrigerate the cooled brownies for several hours or overnight.
This resting period allows the brownies to become denser and fudgier while intensifying the chocolate flavor.
When ready to serve, use the parchment overhang to lift the brownies from the pan before slicing.
Visual Cue: Chilled brownies should feel firm to the touch and slice cleanly with sharp edges.
Common Mistake
Skipping the chill time.
Warm brownies can be soft and difficult to cut neatly. Refrigeration dramatically improves their texture, making them richer, denser, and easier to portion.
Optional Chocolate Frosting
Step 9: Add the Chocolate Chips to a Bowl
Place the dark chocolate chips into a medium heatproof bowl.
Make sure the bowl is dry, as excess moisture can interfere with achieving a smooth frosting.
Visual Cue: The chocolate should be evenly distributed across the bottom of the bowl.
Step 10: Heat the Coconut Milk
Pour the canned coconut milk into a small saucepan and heat until it reaches a gentle simmer.
Do not let it boil vigorously.
Carefully pour the hot coconut milk over the chocolate chips and let the mixture sit undisturbed for 60 seconds.
Then stir until smooth and glossy.
Spread the frosting over the cooled brownies in an even layer.
Visual Cue: The finished frosting should be silky, shiny, and spread effortlessly across the surface.
Chef Tip
For the cleanest presentation, refrigerate the frosted brownies briefly before slicing. The topping will firm up slightly, making each square easier to cut while maintaining a smooth, elegant finish.
By now, your brownies should have a rich chocolate aroma, a dense fudgy center, and a beautifully smooth finish. Even with such a straightforward recipe, there are a few easy-to-miss pitfalls that can affect the final result. In the next section, we’ll cover the most common mistakes—and exactly how to avoid them—so every batch turns out as delicious as the first.
Common Mistakes to Avoid
Even though these Cottage Cheese Flourless Brownies are simple to prepare, a few small missteps can affect their texture, appearance, or flavor. The good news is that most of these issues are easy to prevent once you know what to watch for.
1. Not Blending the Cottage Cheese Until Smooth
Why It Happens
It’s tempting to stop blending as soon as the ingredients look mixed.
How to Fix It
Continue blending until the mixture is completely silky with no visible curds.
How to Prevent It
Scrape down the sides of the blender and blend for an extra 30–60 seconds if needed.
2. Leaving Cocoa Powder Streaks in the Batter
Why It Happens
Dry cocoa can stick to the sides or bottom of the blender.
How to Fix It
Blend again after scraping down the container.
How to Prevent It
Check the batter before pouring it into the pan to make sure the color is completely uniform.
3. Overbaking the Brownies
Why It Happens
Many bakers wait until the center looks completely dry.
How to Fix It
If overbaked, allow the brownies to chill thoroughly, which may improve the texture slightly.
How to Prevent It
Remove the pan when the center is just set and a toothpick comes out mostly clean with a few moist crumbs.
4. Underbaking the Center
Why It Happens
The top may appear done while the middle is still too loose.
How to Fix It
Return the pan to the oven for a few additional minutes if the center is still visibly wet.
How to Prevent It
Look for a center that is set but still soft rather than liquid.
5. Skipping the Cooling Period
Why It Happens
Fresh brownies are hard to resist.
How to Fix It
If they seem too soft, allow them to cool completely before attempting to slice them.
How to Prevent It
Plan ahead and give the brownies enough time to cool naturally before refrigerating.
6. Cutting the Brownies Before Chilling
Why It Happens
Many people expect them to behave like traditional cake brownies.
How to Fix It
Refrigerate the remaining brownies for several hours before slicing again.
How to Prevent It
For the best texture and cleanest edges, chill the entire pan before serving.
7. Unevenly Spreading the Batter
Why It Happens
The thick batter may settle more on one side of the pan.
How to Fix It
Use a spatula to gently level the surface before baking.
How to Prevent It
Take a few extra seconds to smooth the batter into all four corners.
8. Applying the Frosting While the Brownies Are Warm
Why It Happens
The brownies may appear cool on top while retaining heat inside.
How to Fix It
Allow the brownies to cool completely before adding the frosting.
How to Prevent It
Wait until the pan feels close to room temperature before preparing the topping.
9. Stirring the Frosting Too Soon
Why It Happens
It’s easy to start mixing immediately after pouring the hot coconut milk over the chocolate chips.
How to Fix It
If some chocolate remains unmelted, let the mixture sit briefly before stirring again.
How to Prevent It
Allow the chocolate and coconut milk to rest for the full 60 seconds before mixing.
10. Expecting the Final Texture Immediately After Baking
Why It Happens
Fresh-from-the-oven brownies are naturally softer than fully chilled ones.
How to Fix It
Refrigerate them for several hours or overnight to let the texture develop.
How to Prevent It
Think of chilling as part of the recipe rather than an optional step. It transforms the brownies into their fudgiest, most flavorful version.
Quick Troubleshooting Guide
| Problem | Likely Cause | Simple Solution |
|---|---|---|
| Visible cottage cheese pieces | Batter not blended enough | Blend until completely smooth |
| Dry brownies | Overbaked | Bake only until the center is just set |
| Brownies fall apart when sliced | Not fully chilled | Refrigerate for several hours before cutting |
| Uneven texture | Cocoa not fully incorporated | Blend until the batter is uniform |
| Frosting looks grainy | Chocolate wasn’t allowed to melt fully | Let it sit before stirring until smooth |
Baker’s Tip: If your brownies look slightly soft when they come out of the oven, don’t panic. As long as the center is set and not liquid, cooling and chilling will dramatically improve both the texture and the ease of slicing.
Once you’ve mastered these common pitfalls, you’ll be well on your way to consistently delicious results. In the next section, we’ll go beyond the basics with expert tips that can help elevate these brownies from great to truly exceptional.
Expert Tips for the Best Cottage Cheese Flourless Brownies
Once you’ve made these brownies once or twice, a few small techniques can make an already delicious recipe even better. None of these tips require extra ingredients or complicated methods—they simply help you get the most out of the ingredients and steps already in the recipe.
1. Blend Longer Than You Think You Need To
The smoother the cottage cheese mixture, the smoother the finished brownies.
Even if the batter looks blended, an extra 30 seconds can eliminate tiny curds and create an exceptionally silky texture.
2. Scrape Down the Blender Between Blending Stages
After blending the cottage cheese, eggs, and honey, scrape down the sides before adding the cocoa powder.
This helps ensure every ingredient is evenly incorporated and prevents pockets of unmixed batter.
3. Level the Batter Before Baking
Use a spatula to spread the batter evenly into every corner of the pan.
A level surface promotes even baking and gives the finished brownies a more polished appearance.
4. Trust the Toothpick Test—But Read It Correctly
Because these brownies are designed to be fudgy, a perfectly clean toothpick can actually be a sign that they’ve baked too long.
Look for a few moist crumbs rather than wet batter or a completely dry pick.
5. Let the Brownies Cool Naturally
Avoid placing the hot pan directly into the refrigerator.
Allowing the brownies to cool at room temperature first helps them set gradually and supports a better final texture after chilling.
6. Refrigerate Overnight for Maximum Fudginess
While several hours of chilling makes a noticeable difference, an overnight rest produces an even denser, richer brownie.
The chocolate flavor also becomes more pronounced as the brownies rest.
Pro Tip: If you’re serving these for guests, bake them the day before. The texture and flavor are often at their best the next day.
7. Use a Sharp Knife for Clean Slices
Once chilled, use a sharp knife and wipe the blade clean between cuts if needed.
This simple habit creates bakery-style squares with smooth, defined edges.
8. Spread the Optional Frosting in an Even Layer
After stirring the chocolate and coconut milk until glossy, spread the frosting gently from edge to edge.
An even layer not only looks beautiful but also ensures every bite has the perfect balance of brownie and chocolate topping.
9. Allow the Frosting to Set Before Cutting
If you’re using the optional frosting, give it time to firm up in the refrigerator before slicing.
This helps prevent smearing and creates cleaner, more attractive pieces.
10. Don’t Judge the Brownies Straight from the Oven
Freshly baked brownies may seem softer than expected, but that’s completely normal.
As they cool and chill, the structure becomes firmer and the interior develops the dense, fudgy consistency that makes this recipe so satisfying.
Expert Success Checklist
Before serving, run through this quick checklist:
- Batter was blended until completely smooth
- Cocoa powder was fully incorporated
- Batter was spread evenly in the pan
- Brownies were baked until the center was just set
- Brownies cooled completely before chilling
- Chilled for several hours or overnight
- Frosting, if used, was spread over cooled brownies
- Frosting was allowed to set before slicing
What Success Looks Like
If everything went well, your brownies should have:
- A deep chocolate aroma
- A smooth, even surface
- Dense, fudgy slices that hold together well
- A moist interior without being underbaked
- Rich chocolate flavor in every bite
- Clean edges after slicing, especially when well chilled
The beauty of this recipe lies in its simplicity. With just a few ingredients and careful attention to technique, you can create brownies that feel wonderfully indulgent while requiring very little effort.
Now that you’ve mastered the classic version, the next section explores creative ways to enjoy these brownies in different settings and for different preferences, all while staying true to the original recipe and method.
Variations
One of the best things about these Cottage Cheese Flourless Brownies is their versatility. Whether you’re serving them for a casual weeknight dessert or a special celebration, a few simple presentation ideas can make them feel completely different—all while using the same ingredients and baking method.
1. Classic Brownies
Skip the optional frosting and let the rich cocoa flavor shine on its own.
The chilled brownies have a dense, fudgy texture that’s perfect for anyone who loves a simple, intensely chocolatey dessert.
2. Frosted Brownie Version
Prepare the optional dark chocolate frosting and spread it evenly over the cooled brownies.
The glossy topping adds another layer of richness and creates an elegant finish that’s ideal for holidays or dinner parties.
3. Make-Ahead Dessert
Bake the brownies a day before serving and refrigerate them overnight.
The extended chill time helps the texture become even fudgier while allowing the chocolate flavor to deepen.
This is an excellent option when entertaining because the dessert is completely ready before guests arrive.
4. Party-Style Brownie Bites
After chilling, cut the brownies into small bite-sized squares instead of larger pieces.
Their rich flavor makes smaller portions satisfying, and they’re easy to arrange on a dessert platter for gatherings or celebrations.
5. Lunchbox-Friendly Squares
Slice the brownies into individual portions after chilling and store them in an airtight container in the refrigerator.
They’re easy to grab when you want a ready-made chocolate treat during the week.
6. Elegant Dessert Plating
Instead of serving directly from the pan, place each brownie square on its own dessert plate and add a smooth layer of the optional frosting.
The clean edges and glossy finish create a presentation that looks beautifully polished with very little extra effort.
Presentation Tip: Chilling the brownies before slicing helps produce sharp, bakery-style edges that instantly elevate their appearance.
7. Thin Brownie Bars
Cut the chilled brownies into long rectangular bars rather than squares.
This simple change in shape gives the dessert a different look that’s great for buffets, dessert tables, or afternoon coffee breaks.
8. Holiday Dessert Tray Addition
Prepare the frosted version and slice into neat, uniform squares.
Their deep chocolate color and glossy topping make them a striking addition to seasonal dessert assortments while pairing well with a variety of other baked treats.
9. Dessert for Chocolate Lovers
Serve the brownies well chilled to emphasize their dense, truffle-like texture.
The rich cocoa flavor becomes even more concentrated after refrigeration, making this version especially appealing to serious chocolate fans.
10. Everyday Treat or Special Occasion Dessert
One of the biggest strengths of this recipe is its flexibility.
Enjoy the brownies plain for a simple homemade dessert, or add the optional frosting when you’d like a more decadent presentation. The same recipe easily adapts to both casual family dinners and festive occasions.
Quick Comparison
| Variation | Best For | Texture |
|---|---|---|
| Plain brownies | Everyday snacking | Rich and fudgy |
| Frosted brownies | Celebrations and parties | Extra creamy with a smooth topping |
| Overnight chilled | Make-ahead desserts | Dense and intensely fudgy |
| Bite-sized pieces | Dessert platters | Easy to serve and share |
| Brownie bars | Lunches or buffets | Neat, portable portions |
| Elegant plated dessert | Dinner parties | Refined presentation |
Keep in Mind
No matter which variation you choose, the key to success remains the same:
- Blend the batter until completely smooth.
- Bake until the center is just set.
- Cool completely before chilling.
- Refrigerate for several hours—or overnight—for the best texture.
- Add the optional frosting only after the brownies have cooled.
These simple techniques ensure every variation delivers the rich, fudgy consistency that makes this recipe so memorable.
Next, we’ll explore the best ways to serve these brownies, including delicious pairings and presentation ideas that complement their deep chocolate flavor and make every slice feel even more special.
What to Serve With Cottage Cheese Flourless Brownies
These rich, fudgy brownies are satisfying on their own, but pairing them with the right accompaniment can create an even more memorable dessert experience. Whether you’re serving them after a family dinner or arranging a dessert spread for guests, these ideas complement their deep chocolate flavor and dense texture beautifully.
1. A Hot Cup of Coffee
The bold, slightly bitter notes of freshly brewed coffee balance the brownies’ sweetness and enhance their chocolate flavor.
This classic pairing is perfect for an afternoon treat or an after-dinner dessert.
2. Espresso
A small shot of espresso offers an intense coffee flavor that complements the richness of the brownies without overwhelming them.
It’s an elegant option for entertaining and pairs especially well with the optional chocolate frosting.
3. Cold Milk
A chilled glass of milk provides a refreshing contrast to the dense, fudgy texture of the brownies.
The creamy flavor softens the intensity of the cocoa, creating a timeless combination loved by both kids and adults.
4. Hot Chocolate
For true chocolate enthusiasts, serving these brownies with a mug of hot chocolate creates a deeply indulgent dessert experience.
Choose this pairing when you’re looking for maximum comfort on a cool evening.
5. Fresh Berries
Fresh berries add brightness and a juicy contrast that balances the richness of the brownies.
Their natural tartness helps cleanse the palate between bites while adding a pop of color to the plate.
Serving Tip: Arrange a few berries alongside each brownie square for an effortless presentation that looks elegant and inviting.
6. Freshly Whipped Cream
A light dollop of whipped cream adds an airy element that contrasts beautifully with the brownies’ dense interior.
Its mild sweetness allows the chocolate flavor to remain the focal point.
7. Chocolate Dessert Platter
Slice the brownies into smaller squares and serve them as part of a dessert assortment.
Their fudgy texture pairs nicely with lighter baked treats, offering variety without competing for attention.
8. Afternoon Tea
The brownies make an excellent companion to a warm cup of black tea or herbal tea.
The gentle flavors of tea provide balance while letting the chocolate remain the star of the experience.
9. Dessert Board for Gatherings
Arrange chilled brownie bites on a serving board with fresh fruit and other simple desserts.
Cutting them into smaller pieces encourages guests to sample multiple treats while still enjoying their rich flavor.
10. Enjoy Them Straight from the Refrigerator
Because these brownies develop their best texture after chilling, they’re delicious served cold.
The dense consistency becomes almost truffle-like, and the chocolate flavor tastes even more concentrated than it does on baking day.
Pairing Guide
| Serve With | Why It Works | Best Occasion |
|---|---|---|
| Coffee | Enhances chocolate flavor | Breakfast treat or afternoon break |
| Espresso | Rich and sophisticated pairing | Dinner parties |
| Cold milk | Creamy contrast to fudgy texture | Family dessert |
| Hot chocolate | Ultimate chocolate indulgence | Cozy evenings |
| Fresh berries | Bright, refreshing balance | Spring and summer gatherings |
| Whipped cream | Lightens each bite | Special occasions |
| Dessert platter | Adds variety | Holidays and parties |
| Tea | Gentle contrast to rich cocoa | Afternoon snack |
| Dessert board | Easy for sharing | Potlucks and celebrations |
| Chilled on its own | Highlights dense texture | Anytime |
The beauty of these brownies is that they fit just as comfortably into a casual afternoon snack as they do an elegant dessert spread. Whether you enjoy them plain, frosted, or paired with your favorite beverage, their rich chocolate flavor and fudgy texture make them easy to serve in countless ways.
In the next section, we’ll cover the best methods for storing, freezing, and reheating these brownies so you can enjoy every slice at its very best—even days after baking.
Storage & Reheating
One of the biggest advantages of these Cottage Cheese Flourless Brownies is that they store exceptionally well. In fact, many people find the texture becomes even denser and fudgier after a day in the refrigerator.
Whether you’re baking ahead for a gathering or saving leftovers for later, proper storage helps preserve both flavor and texture.
Storage & Reheating Guide
| Storage Method | How Long | Best Container | Quality | Reheating or Serving Tip |
|---|---|---|---|---|
| Refrigerator | Up to 5 days | Airtight container | Dense, moist, and fudgy | Enjoy chilled or let sit at room temperature for a few minutes before serving |
| Freezer | Up to 2 months | Freezer-safe airtight container with parchment between layers | Maintains rich flavor and texture when properly wrapped | Thaw overnight in the refrigerator before serving |
| Meal Prep Portions | Several days in the refrigerator | Individually wrapped or portioned in airtight containers | Convenient grab-and-go servings | Serve directly from the refrigerator for a firm, fudgy bite |
| Frosted Brownies | Up to 5 days refrigerated | Airtight container | Frosting stays smooth and flavorful | Refrigerate until ready to enjoy |
How to Refrigerate
After the brownies have cooled completely and been sliced, transfer them to an airtight container.
If stacking multiple layers, place a sheet of parchment paper between them to help protect the surface and optional frosting.
Keeping the container tightly sealed helps maintain moisture and prevents the brownies from absorbing odors from other foods.
How to Freeze
These brownies freeze well for longer storage.
For best results:
- Cool completely.
- Chill until firm.
- Slice into individual portions.
- Place parchment paper between layers.
- Store in a freezer-safe airtight container.
Freezing individual pieces makes it easy to remove only what you need.
Best Way to Thaw
Transfer frozen brownies to the refrigerator and allow them to thaw overnight.
This gradual thawing helps preserve their dense texture and prevents excess moisture from forming on the surface.
If you’re short on time, let an individual brownie sit at room temperature until softened to your liking.
Should You Reheat Them?
Unlike many baked desserts, these brownies are designed to shine when served cool.
Their signature fudgy texture develops during chilling, so reheating isn’t necessary.
If you prefer a softer bite, simply let a refrigerated brownie rest at room temperature for 10 to 15 minutes before serving.
Meal Prep Tips
These brownies are an excellent make-ahead dessert because they portion easily and retain their quality for several days.
For convenient serving:
- Cut into individual squares after chilling.
- Store portions in airtight containers.
- Keep the optional frosting intact by avoiding stacking without parchment.
- Prepare the entire batch a day ahead for parties or family gatherings.
Storage Tip: Many desserts are at their best on the day they’re baked, but these brownies are different. An overnight rest in the refrigerator allows the flavors to meld and the texture to become even richer and more cohesive.
Signs They’re Still Fresh
Your brownies should have:
- A rich chocolate aroma
- A moist, dense interior
- A smooth surface without excessive drying
- Clean slices that hold their shape
- A creamy, fudgy bite
If they begin to dry out or lose their signature texture, they’re best enjoyed sooner rather than later.
Proper storage makes these brownies an ideal dessert for busy weeks, holidays, and special occasions. In the next section, we’ll take a closer look at the best make-ahead strategy, including a simple timeline to help you prepare them in advance while achieving the ultimate fudgy texture and chocolate flavor.
Can You Make It Ahead?
Absolutely! In fact, these Cottage Cheese Flourless Brownies are one of those rare desserts that often taste and feel even better after they’ve had time to rest. Because the recipe benefits from chilling, making it ahead isn’t just convenient—it’s actually recommended for the best texture and easiest slicing.
Why Making Them Ahead Works So Well
As the brownies cool and chill, the moisture redistributes throughout the pan and the structure becomes firmer. The result is a denser, fudgier brownie with a richer chocolate flavor and cleaner edges when sliced.
If you’ve ever struggled to cut warm brownies into neat squares, this recipe solves that problem with a little patience.
A Simple Make-Ahead Timeline
| When | What to Do |
|---|---|
| The day before serving | Bake the brownies and let them cool completely. Refrigerate for several hours or overnight. |
| After chilling | Prepare and spread the optional chocolate frosting, if using. |
| Before serving | Slice into squares and arrange on a serving plate. |
| Leftovers | Store covered in the refrigerator for several days. |
This timeline is especially helpful when preparing dessert for holidays, birthdays, potlucks, or dinner parties.
For the Best Texture
If your schedule allows, refrigerate the brownies overnight before slicing.
That extra time helps:
- Intensify the chocolate flavor
- Create a firmer, fudgier texture
- Produce cleaner slices
- Make serving easier
- Improve the overall eating experience
Many bakers notice that the brownies taste even more balanced the next day as the flavors have time to meld.
Make-Ahead Tip: If you’re planning to serve the optional frosting, wait until the brownies have cooled completely before spreading it over the top. This helps the frosting stay smooth and glossy.
Planning for a Special Occasion
These brownies are an excellent choice when you need a stress-free dessert.
By baking them ahead of time, you can focus on the rest of your menu while knowing dessert is already prepared. When it’s time to serve, simply slice and enjoy.
Because they’re delicious straight from the refrigerator, there’s no need for last-minute reheating or complicated finishing steps.
How Far in Advance Can You Make Them?
For the best balance of freshness and texture:
- Bake 1 day ahead: Ideal for maximum fudginess.
- Bake several days ahead: Store in an airtight container in the refrigerator until ready to serve.
- Bake well in advance: Freeze cooled, sliced brownies and thaw them in the refrigerator before serving.
This flexibility makes the recipe a great option for meal prep, entertaining, and busy weeks when having a ready-made dessert on hand is a welcome convenience.
Final Make-Ahead Checklist
Before serving, make sure you’ve completed these steps:
- Brownies baked until the center was just set
- Cooled completely
- Chilled for several hours or overnight
- Optional frosting added after cooling
- Brownies sliced with a sharp knife
- Stored in an airtight container until serving
With a little planning, these brownies reward you with exceptional texture and flavor, proving that sometimes the best desserts are the ones you don’t rush.
In the next section, we’ll take a balanced look at the nutritional profile of this recipe and discuss how it can fit into an overall eating pattern without making exaggerated health claims.
Is This Cottage Cheese Flourless Brownies Recipe Healthy?
The answer depends on what you’re comparing it to and how you enjoy it. While these brownies are still a dessert, their simple ingredient list and cottage cheese base give them a different nutritional profile than many traditional brownie recipes.
Rather than labeling them as “healthy” or “unhealthy,” it’s more helpful to look at the ingredients and enjoy them as part of a balanced eating pattern.
A Closer Look at the Main Ingredients
Cottage Cheese
Cottage cheese contributes protein along with a creamy texture that replaces the need for flour in this recipe.
It also helps create a rich, satisfying brownie without relying on a long list of ingredients.
Eggs
Eggs provide structure and protein while helping the brownies bake into a dense, fudgy consistency.
They also contribute richness that supports the overall texture.
Dutch Process Cocoa Powder
Unsweetened cocoa powder delivers concentrated chocolate flavor with very little added sugar.
Its bold taste means the brownies can achieve a rich chocolate profile without additional chocolate in the batter itself.
Honey or Coconut Sugar
The sweetener provides balance for the cocoa’s natural bitterness and contributes to the moist texture.
Whether you choose honey or coconut sugar, both add sweetness and should be considered part of the dessert’s overall carbohydrate content.
Optional Chocolate Frosting
The frosting adds another layer of chocolate richness and creates a more decadent dessert experience.
If you prefer a simpler treat, the brownies are equally enjoyable without it.
General Nutritional Balance
Although exact nutrition depends on portion size and the sweetener you choose, these brownies provide a mix of:
- Protein from the cottage cheese and eggs
- Carbohydrates from the honey or coconut sugar
- Fat from the cottage cheese, eggs, and optional frosting
- Chocolate flavor from unsweetened cocoa powder
Because they contain protein-rich ingredients, many people find them more satisfying than desserts made primarily with refined flour and sugar alone.
Portion Size Matters
Even desserts made with simple ingredients are best enjoyed in reasonable portions.
Their rich, dense texture naturally lends itself to smaller servings, making it easy to savor one square without feeling the need for a large piece.
Balanced Approach: Pair a brownie with fresh fruit or enjoy it after a balanced meal to create a satisfying dessert without overcomplicating your menu.
What Makes These Brownies Stand Out?
Compared with many classic brownie recipes, this version:
- Uses no flour
- Relies on cottage cheese for its creamy base
- Gets its intense chocolate flavor from Dutch process cocoa powder
- Comes together with a short ingredient list
- Delivers a dense, fudgy texture without complicated techniques
These qualities make it a unique recipe for anyone looking for a flourless chocolate dessert with a simple preparation method.
Nutrition at a Glance
| Nutrient Category | Primary Source in This Recipe |
|---|---|
| Protein | Cottage cheese and eggs |
| Carbohydrates | Honey or coconut sugar |
| Fat | Cottage cheese, eggs, optional frosting |
| Chocolate Flavor | Dutch process cocoa powder |
| Moisture | Cottage cheese and honey (if used) |
A Realistic Perspective
No single recipe determines an overall eating pattern, and desserts can absolutely have a place in a balanced lifestyle.
These brownies are meant to be enjoyed for their rich chocolate flavor and satisfying texture. The addition of cottage cheese and eggs contributes protein and moisture, while the flourless batter creates a distinctive fudgy bite that sets them apart from many traditional brownies.
The best approach is to enjoy them mindfully, appreciate their simple ingredients, and share them with family and friends whenever you’re craving a homemade chocolate treat.
Next, we’ll compare these Cottage Cheese Flourless Brownies with a more traditional brownie recipe, looking at differences in flavor, texture, preparation, and overall baking experience to help you decide which style best suits your preferences.
Comparison Table
If you’re deciding between these Cottage Cheese Flourless Brownies and a classic brownie recipe, it’s helpful to understand how they differ. While both satisfy a chocolate craving, they offer distinct textures, ingredient profiles, and baking experiences.
The table below provides a general comparison based on the recipe method and typical characteristics of traditional brownies.
| Feature | Cottage Cheese Flourless Brownies | Traditional Brownies |
|---|---|---|
| Flavor | Rich cocoa flavor with a clean chocolate finish | Rich chocolate flavor often accompanied by butter and flour notes |
| Texture | Dense, moist, and especially fudgy after chilling | Can range from cakey to fudgy depending on the recipe |
| Main Structure | Cottage cheese and eggs | Flour, butter, and eggs |
| Protein | Higher due to cottage cheese and eggs | Typically lower because flour is the primary structural ingredient |
| Flour | None | Usually includes all-purpose flour |
| Sweetener | Honey or coconut sugar | Often granulated or brown sugar |
| Optional Topping | Dark chocolate and coconut milk frosting | Varies widely by recipe |
| Prep Method | Blender batter with minimal mixing | Usually requires multiple mixing steps |
| Prep Time | Quick ingredient preparation | Often involves several bowls and more mixing |
| Bake Time | 40–45 minutes | Varies by recipe |
| Best Texture | After several hours or overnight in the refrigerator | Often enjoyed after cooling at room temperature |
| Difficulty Level | Beginner-friendly | Beginner to intermediate depending on technique |
Which One Is Right for You?
Choose Cottage Cheese Flourless Brownies if you:
- Love extra-fudgy brownies with a dense texture
- Appreciate recipes with a short ingredient list
- Want a blender-friendly baking method
- Enjoy desserts that can be made ahead
- Prefer a flourless brownie option
Choose a traditional brownie recipe if you:
- Prefer a lighter or cakier crumb
- Enjoy classic butter-and-flour bakery-style brownies
- Want a dessert that’s typically served shortly after cooling
- Like experimenting with different brownie textures
Good to Know: These two styles aren’t competing—they simply offer different experiences. Many brownie enthusiasts enjoy having both in their recipe collection depending on the occasion and the texture they’re craving.
Side-by-Side Highlights
| Category | This Recipe Excels In |
|---|---|
| Simplicity | Few ingredients and easy preparation |
| Make-Ahead Convenience | Improves after chilling overnight |
| Chocolate Intensity | Deep cocoa flavor from Dutch process cocoa |
| Texture | Dense, creamy, and fudgy |
| Cleanup | Minimal thanks to blender preparation |
One of the most appealing qualities of this recipe is that it doesn’t try to imitate a classic brownie exactly. Instead, it embraces its own identity, using cottage cheese to create a uniquely rich and satisfying dessert that’s easy to prepare and rewarding to make.
In the next section, we’ll look at the kinds of home bakers and dessert lovers who are most likely to enjoy this recipe, from busy families to beginners looking for a dependable chocolate treat.
Who Will Love This Recipe?
One of the reasons these Cottage Cheese Flourless Brownies are so appealing is their versatility. With a simple ingredient list, blender-friendly preparation, and rich chocolate flavor, they’re suitable for a wide range of home bakers and dessert lovers.
Whether you’re making a quick weeknight treat or preparing dessert for guests, this recipe adapts beautifully to different lifestyles and occasions.
Busy Parents
When time is limited, simple recipes become invaluable.
With just a few ingredients and a blender doing most of the work, these brownies are easy to fit into a busy schedule. Better yet, they can be made a day ahead, so dessert is already taken care of when you need it.
Beginner Bakers
If you’re new to baking, this recipe is an excellent place to start.
There are no complicated mixing techniques or difficult steps to master. Blend, pour, bake, cool, and chill—that’s the foundation of a dessert that looks and tastes impressive with surprisingly little effort.
The detailed visual cues throughout this guide also make it easier to recognize when each stage is progressing as expected.
Chocolate Lovers
If your ideal dessert is rich, deeply chocolatey, and fudgy rather than light and cakey, these brownies are likely to become a favorite.
The Dutch process cocoa powder provides an intense chocolate flavor that becomes even more pronounced after the brownies have chilled.
Make-Ahead Entertainers
Hosting friends or family often means juggling multiple dishes at once.
Because these brownies improve after several hours in the refrigerator, they’re a smart dessert choice for entertaining. You can bake them ahead of time and simply slice and serve when the meal is over.
Meal Preppers
Having individual brownie squares ready in the refrigerator makes it easy to enjoy a homemade dessert throughout the week.
Their dense texture holds up well during storage, making portioning and serving simple.
Why Meal Preppers Appreciate This Recipe: The brownies maintain their quality after chilling, so each slice tastes just as satisfying days later.
Fans of Flourless Desserts
If you’re looking for a brownie recipe made without flour, this one offers a unique approach.
Rather than relying on specialty ingredients, it uses cottage cheese and eggs to create structure while delivering a moist and satisfying texture.
Home Bakers Who Love Simple Ingredients
Some of the best recipes are built around a short, carefully balanced ingredient list.
If you enjoy desserts that don’t require a long shopping trip or complicated preparation, you’ll appreciate how much flavor these brownies achieve with just a handful of pantry and refrigerator staples.
Holiday and Potluck Hosts
These brownies transport easily, slice neatly after chilling, and can be served plain or topped with the optional chocolate frosting.
Their make-ahead convenience makes them especially practical for celebrations where preparing everything at the last minute isn’t realistic.
Anyone Who Loves Fudgy Brownies
Texture is often what separates a good brownie from a great one.
Because these brownies become denser as they chill, they’re especially appealing to anyone who prefers a rich, moist, almost truffle-like consistency over a fluffy or cake-like crumb.
Anyone Looking for a Reliable Chocolate Dessert
Sometimes you simply want a recipe that works consistently and delivers satisfying results.
With straightforward instructions, minimal equipment, and ingredients that each serve a clear purpose, this recipe is easy to return to whenever a chocolate craving strikes.
At a Glance
This recipe is perfect for:
- Beginner bakers
- Busy families
- Chocolate enthusiasts
- Make-ahead meal planners
- Potluck and party hosts
- Fans of flourless desserts
- Home cooks who prefer simple recipes
- Anyone who loves a dense, fudgy brownie
The combination of convenience, rich flavor, and dependable results gives these brownies broad appeal, whether you’re baking for yourself or sharing them with others.
Up next, we’ll answer some of the most common questions about this recipe, including baking, storage, texture, and serving tips, along with additional FAQs designed to help you achieve the best possible results every time.
Final Thoughts
If you’re looking for a dessert that’s rich, fudgy, and surprisingly easy to make, these Cottage Cheese Flourless Brownies are well worth trying. With just a handful of simple ingredients and a blender doing most of the work, you can create brownies with an incredibly dense texture and deep chocolate flavor that only gets better after a few hours in the refrigerator.
Whether you enjoy them plain or topped with the optional chocolate frosting, this recipe proves that you don’t need a long ingredient list to make an unforgettable homemade dessert. The combination of cottage cheese, eggs, honey or coconut sugar, and Dutch process cocoa powder creates a unique brownie that’s moist, satisfying, and perfect for making ahead.
Don’t be surprised if these brownies become even more delicious the next day. A little patience during the cooling and chilling process rewards you with cleaner slices, a richer flavor, and the signature fudgy bite that makes this recipe stand out.
If you make this recipe, take your time, follow the simple steps, and enjoy the transformation from a silky batter into an irresistible chocolate treat. Whether you’re baking for family, friends, or simply treating yourself, these brownies are sure to earn a permanent place in your dessert rotation.
And if you loved this recipe, keep exploring more homemade favorites—you never know which simple recipe will become your next go-to classic. Sometimes the most memorable desserts come from the simplest ingredients, prepared with a little care and shared with the people you love.
Cottage Cheese Flourless Brownies
Ingredients
Equipment
Method
- Preheat oven to 350°F (177°C).
- Line an 8-inch square baking pan** with parchment paper.
- Add the cottage cheese, eggs, and honey to a blender. Blend until completely smooth.
- Add the cocoa powder and blend again until the batter is fully combined and smooth.
- Pour the batter into the prepared pan and spread evenly.
- Bake for 40–45 minutes, or until the center is set and a toothpick inserted into the center comes out mostly clean.
- Let the brownies cool completely.
- For the best texture and flavor, refrigerate for several hours or overnight before slicing.
Notes
* Do not overbake; the center should be just set.
* Chilling overnight produces the fudgiest brownies.
* The optional chocolate frosting adds an extra layer of rich chocolate flavor.